Wednesday, January 24, 2018

New Year, New Project List

A new year brings a fresh set of resolutions, new goals, hopes, promises and whatever else you can dream of.  In my case, I have a list of house mini remodel projects that I want to complete.  Now I know I promised my husband that once we went through a complete house remodel a few years ago that I wouldn't do any more for awhile...


But that was a couple years ago and I'm starting to get the itch to redecorate and rearrange and dare I say...remodel.


First things first. Living room seating.  Someone broke our reclining loveseat and one of the seats which no longer reclines and nobody will confess to the crime but the chair is pretty much useless now.  Anyway...a couple of years ago I drove an hour round trip to pick up two wingback chairs that I just had to have and shoved them in my mom's SUV with the hatchback open because they didn't fit all the way.  Those 2 chairs I "had" to buy have been permanent residents in the basement for the last couple of years.  Along with the fabric that I already purchased to reupholster them.  So wingback chair set...you are on my list.


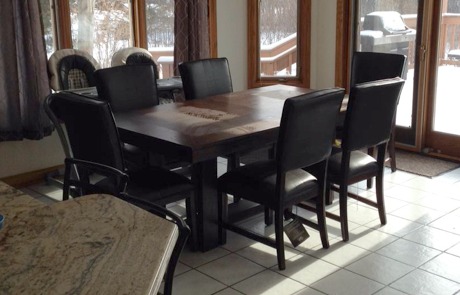
Speaking of furniture living in my basement.  Next up is the stack of dining chairs and new dining room table.  Another one of those "had to have" purchases that I never got around to refinishing.  I'm not sure if its the fact that I have young children that is holding me back from having nice things or if its my lack of motivation due to my dislike of painting chairs and all of their details and crevices.  Either way, look out dining room, hopefully by the end of 2018 you will have a new dining room table set!
Current Set:
Hoarded Basement Chairs:


Now for the project I'm most excited for as it will help with clutter in our house, especially with the cooler weather and the need for extra winter gear.  Wish list: Locker area with seating and storage. Location: after searching my house for a good spot, it has been determined that if I remove the cabinets in the laundry room it should allow for enough room to host a locker area.  Bonus - the laundry room is directly located off the garage entry way and also has a door to shut to hide the inevitable mess of boots/jackets/backpacks/hats/etc.  Due to the fact that I like to DIY, this project will be done by me even though I have never removed cabinets or a countertop before but nothing a little sweat, tears and research can't do!


Last but not least, is the aforementioned basement.  While the entire basement is definitely on my remodel list, I will have to take it a little at a time as it is currently serving as my hoarding area and also over 1,000 finished square feet of straight up 1990's era.  Meaning blue carpet, honey oak wood, shiny brass hardware, and horribly ugly dated lighting.  Within this area is also a full bathroom, and I'm itching to paint over the honey oak cabinets, remove the brass hardware, update the builder grade bathroom mirror and maybe *Ben don't read this part* redo the flooring.  We shall see.  By that I mean, lets see if my husband does indeed plan a trip to Vegas with his friends so that I can start the remodel job without him knowing.


So there you have it.  The great house list project of 2018.  Now that its published I feel like I'm accountable for finishing all that I set out to do.  How about you, do you have any house projects that you hope to tackle this year?  Don't forget to remind me of the list of projects just to make sure I'm actually getting them done.  Stay tuned for updates on my Facebook page, Flipping Unbelievable.  You can also follow me on Instagram.

Tuesday, December 12, 2017

Painting a Couch

My photographer friend was seeking an older Victorian couch for her outdoor photo shoots.  She messaged me that she found this one:


Beautiful isn't it?  Seriously I love the detail on these old couches but the fabric is typically, well, dated.  Knowing that she was going to be using this beauty for pictures in the woods, I told her it probably wasn't worth the investment for new upholstery fabric and a professional to reupholster it for her, and the fabric itself was in good shape. Like most things in my world, I told her that this could be made beautiful again with a little bit of paint, and I'm not talking on the wood!
My friend wanted a light neutral color, but with all of the red stripes on the existing fabric I knew this wouldn't be possible.  We settled for a medium gray color and gave the couch a good vacuuming.  The supply list for this project is short and includes the following items:
Spray bottle filled with water
Paint brush
Small detail paint brush
Chalk style paint
220 grit sandpaper
The fabric needs to be damp in order to allow to allow the paint to fully be absorbed. Spray the fabric with water and keep the spray bottle handy so that as you are painting you can spray as needed. Then just grab a paint brush and paint and start painting!  It will probably take two coats, here is the couch with just one coat of paint.
You can see some of the stripes still showing through.  After one coat of paint is applied, allow to dry.  The fabric will be a little bit stiff, so use sandpaper to smooth it out.  The fabric will always be stiffer than what it was initially, so keep that in mind.
Here is an in progress shot.  The fabric looks damp in some areas while the paint is drying.
Two coats of chalk paint gave very good coverage.  You can still see the texture of the original fabric, but the colors are now covered with fresh paint.
Now without further ado, here is what it looks like now!  Even more beautiful and easy for anyone to do.  Just two coats of paint with sanding after each coat. No sealer is necessary.
Here is the same couch set up and ready for Christmas pictures at a tree farm.  I think the new color looks great!
What do you think?  Do you like how it turned out?  Are you brave enough to paint fabric?
Want to see more of my work?  Follow me on Facebook at Flipping Unbelievable


Thursday, December 7, 2017

Create Your Own Ornament Wreath


If you are like me and you have somehow accumulated no less than a million round ornaments that you will never possibly be able to use, this project is definitely for you!  I love the look of the ornament wreaths, but I'm cheap and hate paying for them.  I figured out how to make this beautiful ornament wreath and it was so easy to do!
I bought a foam wreath form at Joann Fabrics.  I have a hot glue gun and glue sticks on hand so if you don't already its worth the investment!  I had most of the ornaments I needed in various sizes, but they are also very inexpensive to buy in bulk or you can get them at the Dollar Tree.  You should have at least 2 different sizes, I have 3 different sizes on my wreath.  Decide on a color theme or go crazy with multicolor! I stuck to metallic and added some matte and some glitter for a little bit of contrast.

Start by gluing the larger ornaments on the outside circle of the foam. Glue to the foam as well as the adjacent ornaments for durability.


Then glue the ornaments along the inside circle of the foam.  Once complete, fill in the remaining area with various sizes.  If you see any bare spots, fill with smaller ornaments.  It can help to lay the ornaments on first without gluing just to give you a better idea of the layout.  Vary your colors so that they aren't all grouped together in the same area.  Here is what mine looked like when complete!


You can hang it with a pretty ribbon of your choice. My kids actually really enjoyed helping me with this project.  They took all of the hooks of the ornaments and handed me the ornaments as I glued them on.  It went really quick and I love how it turned out!


Do you plan to tackle your own ornament wreath this holiday?  I would love to see yours if you do!  Visit me on Facebook and see more of my creations at Flipping Unbelievable.

Tuesday, November 21, 2017

From Sticker Disaster to French Provincial Beauty

Is it normal that I got excited when I first laid eyes on this piece?  My love for French Provincial must hinder my eyesight I guess, because this dresser was in rough shape.  It was structurally sound though and to my surprise, very clean inside all of the drawers.


Even though I refinish older furniture to give it an updated look, I tend to stay true to the style of the piece.  In this case, I could tell the hardware on this dresser was not the original, and was doing nothing for it, so I bought new French provincial style hardware to compliment the style and painted it white.


After quite a bit of goo gone, a heat gun and sanding, I was finally able to remove all of the stickers and glitter.  A couple coats of primer and this piece was ready for paint!  I choose a gray color and painted the entire piece.  I then used white paint and very carefully painted the grooved details.  I love how it turned out!


Here is another before and after comparison.  I found a pretty mirror that really complimented the piece and ended up selling it with the dresser.  What do you think, would you even consider tackling a dresser like this?


For more items, check out Flipping Unbelievable on Facebook.

Wednesday, October 18, 2017

Outdated Nightstand Makeover

MCM is really gaining popularity.  I have to admit, several years ago I just wasn't a fan of the style, but lately I have really begun to appreciate the look.  I have had this set of nightstands for awhile now, and I finally got around to giving them a makeover; I guess you could even call it a major facelift.  Somebody before me had attempted to refinish this in an interesting forest green color. Check out the before and after picture:


Almost unrecognizable, right?  Let me show you how I completed this transformation!


First, I removed the hardware and patched the holes.  Then I added trim around the drawer fronts. I purchased the trim at Home Depot, it is thin enough that it wouldn't stick out too far but added some depth to the piece.  I cut the trim to size and then used wood glue to attach it and clamped it overnight to the drawer to dry.
Its already starting to look better! It needed a new top though, as the old top piece seemed nonexistent since it sat flush with the first drawer.  I cut new wood to size and then used screws and wood glue to secure.  Then let it sit overnight and sanded it all smooth.  Here is the piece ready for paint and stain:
I did this to both nightstands.  I stained the top a mixture of General Finishes Weathered Gray and Espresso water based stain.  I sprayed the drawers and base with General Finishes Lamp Black Milk Paint, then sealed everything with several coats of General Finishes High Performance top coat in Satin.  New holes were drilled and the hardware was replaced with new knobs.  Here is the final product:


What do you think?  Do you like the transformation?  To see more pieces like this, follow me on Facebook at Flipping Unbelievable

Monday, July 31, 2017

I bonded with Bondo!

Bondo has not sponsored this post in any form, but I'm just so amazed at how well this product works that I had to share!


A client brought me a table to paint.  It was missing a big piece of wood on one side, and it was slightly obvious because there were 3 other matching sides of the table.  See picture below with the missing area circled in blue:


I needed something that would be durable, and since woodworking is not my strong point, I didn't trust my skills with cutting a new piece from wood.  Keep in mind this piece was going to be painted, so I knew I wouldn't have to worry about staining over it.  Then Bondo walks into my life, and I foresee a lifelong friendship between us.


I was cleaning up my craft area, and noticed that my glue gun made a mess everywhere.  I thought it was going to be difficult to clean up, but it all stuck together and came off easily.  This gave me the idea for making a mold with hot glue!  I sprayed the area I wanted to use for a mold (luckily there were 3 other matching sides, so finding a duplicate was easy), then I covered it in layers and layers of hot glue.  After it all dried, it came off really easily!  Now I had custom mold!

Here is a picture of the mold, keep in mind, its not the most beautiful thing but it gets the job done.


Next you will need to work quickly, as Bondo is extremely fast drying.  Sorry I didn't get pictures as I was worried about the time.  Mix the two parts together as instructed, it will be very goopy. Spoon the mixture into the beautiful mold.  Then place it where you want it and hold it in place while it dries.  Keep in mind this just takes a few minutes.  You can let it dry further if you want, but I like it to be just a little pliable to make the final touches to shape it as required.  You can sand it smooth.  It turns out to be a pinkish color, but since I knew it would be painted over that was fine with me.


Check it out, perfect match!  Also, this stuff dries super hard.  After awhile I had a hard time sanding it down any further as it fully dried.  After I primed the entire piece, I asked my husband to guess which side had been repaired, and even he couldn't tell!
Here it is with paint.


Here is the finished product!


Does anybody else get as excited as I do to try new stuff and is beyond delighted to find out it works better than expected?  Seriously this opens so many new doors for me.  Okay not really, but I already have many other ideas to use this stuff on.

Follow me on Facebook to see more furniture transformation pictures!


Wednesday, June 28, 2017

What the Deck?!?!

When we first looked at our house before buying it I thought, wow-that's a lot of deck!  A few years later and we realized, it was time for the deck to be re-stained.  Like everything else about the house, we liked the deck but didn't love the color.  It had an orange-ish look to it.  Also like everything else about the house, we chose to use a gray color for the stain to change the look.  Check out the results below:


This was definitely a labor of love.  We went through 15 gallons of stain.  Everything needed two coats of stain as we changed the color.  We chose Sherwin Williams SuperDeck Solid Stain in Caribou.  We waited until they had a 40% off sale and bought the stain.   They said they would honor the price if it wasn't enough.

It was NOT enough.  We went back a month later and they still honored the price.

We have two decks in our yard, one right off the dining room with a set of stairs and then another deck connected by a wood path that surrounds the pool - including a pergola (more on that nightmare later!)  Here you can see how badly chipped the existing finish is on the deck:


The first step was to remove everything off the deck and then clean it.  For the initial cleaning, a broom or leaf blower worked well for us.  Then using 80-120 grit sandpaper, we used a palm sander to sand the floorboards and handrails of the deck, along with any random spots that needed attention.  It wasn't necessary to sand the existing stain off completely, but just enough to remove all of the chipped pieces off from the existing stain.  Then we used a deck cleaner solution to wash the deck completely and hosed it off with water.  Look how much better it looks already!


Due to the fact that I enjoy painting, I own several spray paint guns.  This was crucial in re-staining the deck since we had no less than 5 million spindles that needed to be stained.  The upper deck off the house was phase 1 of the project.  I tackled the spindles with my spray gun and my husband got to work on the deck floor and supporting beams.  This deck went relatively quickly, and even with applying two coats we were able to finish the same day - about 7 hours.


Here is a picture of the upper deck as we waited for it to dry.


Phase 1 went well and gave us false confidence that Phase 2 would follow suit.  I spent a couple hours the following weekend staining the pathway that connects the two decks and the stairs on the pool deck so that we wouldn't have to worry that we would tread on our only entrance to that deck later on.


We repeated the steps of removing everything from the pool deck, cleaning, sanding, and washing.  Then it was time to stain.  This took several days...much longer than the previous deck.  The pergola took a day by itself.  I used my spray gun and got on a ladder and sprayed each slat in the pergola and then moved the ladder to the next area.  Every section, both sides of the slates, two coats.  I was ready to kick down that pergola.
Here is after just one coat, you can still see some of the orange showing through:
We also had to be careful around the pool and some of the other permanent fixtures like the pool slide.  For those areas, I hand stained so that there wasn't a risk of getting a lot of stain in the pool.  The area in the back of the pool simply consists of spindles around the edge, no deck floor to stand on.  This required a somewhat Spiderman type feat to successfully stand on the spindles while using the spray gun to stain the area next to it, and repeat.  Perfection was not the goal at this point, we were just looking to finish.  So there may be a few "orangish" spots that may need some touch up down the road but for now we would rather enjoy the deck than continue to slave away on something that gets accumulates rain and bird poop on an almost daily basis.


Did I mention that we went through 15 gallons of stain, broke one air compressor, broke one spray paint gun, and wondered why we were crazy enough to buy a house that had a deck of that size?  Oh the joys of home ownership.


Well here it is, in all its glory.  In the end, I'm really happy with the results and love the outcome.  The neighbors have also told us how much better it looks as well so some could say we raised the overall property value of the entire block...
So who is crazy enough to want to tackle their own deck?  Did I scare you away from doing it yourself?


Follow me on Facebook at Flipping Unbelievable to check out more of my work.